
BASIC I/O AD Hardware User Manual
BIO4AD, BIO8AD and BIO16AD Products
| [ Home ] [ Table of Contents] [ Chapter 1] [ Chapter 2a ] [ Chapter 2b ] [ Chapter 3] [ Contact duTec ] | |
|
|
BASIC I/O AD Hardware User Manual |
Chapter 2c
BIO4AD, BIO8AD and BIO16AD Products |
Certain guidelines must be followed when installing I/O modules on the BASIC I/O AD chassis. In particular, the analog modules must be grouped separately from the digital modules on each I/O chassis. Using the worksheet, place the desired I/O modules in the indicated positions.
| I/O Module Installation Guidelines | ||||
| 1. Install all analog input modules beginning with module #0, then #1 and so on. If none are used, skip this step.
2. Install all analog output modules
3. Repeat step 2 for the digital |
Module # |
Analog/Digital Signal |
Module Part No. |
Remarks |
0 |
______________ |
______________ |
______________ |
|
1 |
______________ |
______________ |
______________ |
|
2 |
______________ |
______________ |
______________ |
|
3 |
______________ |
______________ |
______________ |
|
4 |
______________ |
______________ |
______________ |
|
5 |
______________ |
______________ |
______________ |
|
6 |
______________ |
______________ |
______________ |
|
7 |
______________ |
______________ |
______________ |
|
8 |
______________ |
______________ |
______________ |
|
9 |
______________ |
______________ |
______________ |
|
10 |
______________ |
______________ |
______________ |
|
11 |
______________ |
______________ |
______________ |
|
12 |
______________ |
______________ |
______________ |
|
13 |
______________ |
______________ |
______________ |
|
14 |
______________ |
______________ |
______________ |
|
15 |
______________ |
______________ |
______________ |
|
Analog Inputs
Modules should NEVER be installed or removed while power is applied to the BASIC I/O AD.
Note: Analog modules normally run hot to the touch.
Correct polarity connections are essential to proper operation of all analog inputs. Connections to terminals marked with a "+" must be more positive than the terminals marked with a "-". Thermocouples and RTDs are connected directly to the modules with special connectors which insure correct polarity.
Module status indicators are ON dimly, when analog input modules are installed, wired correctly, and monitoring a valid signal. The indicator light may be ON brightly, OFF, or flicker otherwise.
Figure 2-11, Figure 2-12, and Figure 2-13 show the wiring for various types of analog inputs. With the exception of thermocouples and RTDs, connections are made via the black terminal strip. In the case of thermocouple and RTD modules, connections are made directly to the module, mating connectors are included. There must be nothing connected to the screw terminals corresponding to these module positions.
The source of analog inputs is external to the BASIC I/O AD in most circumstances. Exceptions are those of RTD and Type 590 temperature input modules where source excitation is supplied within the module.
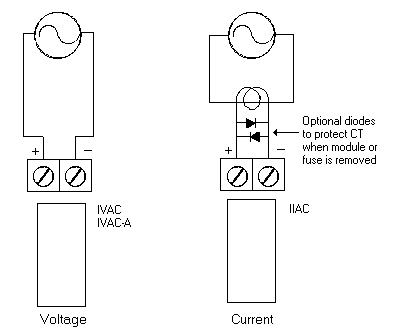
Figure 2-11 AC Current and Voltage Wiring
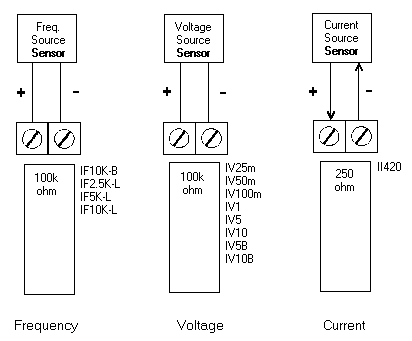
Figure 2-12 Analog Frequency, Voltage, and Current Input Wiring
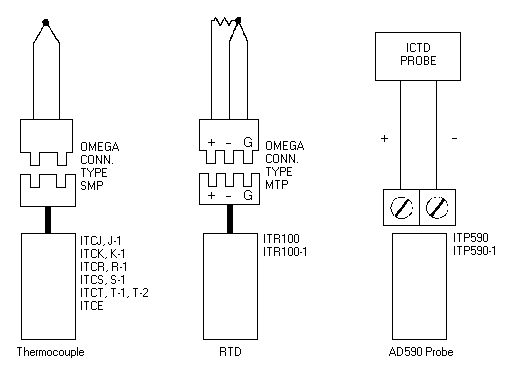
Figure 2-13 Temperature Input Wiring
Analog Outputs
Modules should NEVER be installed or removed while power is applied to the BASIC I/O AD.
Note: Analog Modules run hot to the touch.
Both voltage and current output modules provide their own isolated power output. This eliminates the need for external power supplies and insures electrical isolation between each output. This also makes it possible to wire voltage outputs in series to obtain larger voltage swings (consult application support).
Module status indicators for analog outputs blink briefly when outputs are updated. It should be noted that the status indicator only reflects the TTL data stream to the modules. This in itself does not indicate the actual value of the output signal. Outputs can only truly be verified by monitoring the device to be controlled using a multimeter, oscilloscope or employing an analog input module as a feedback tool.
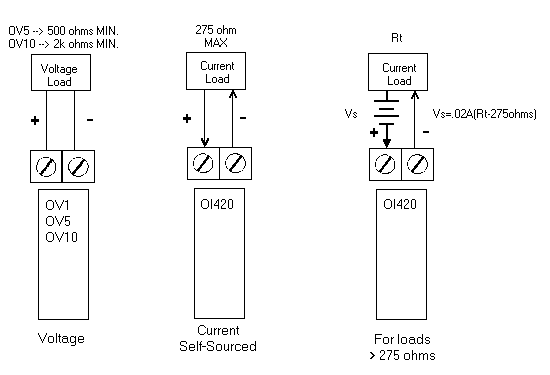
Figure 2-14 Analog Voltage and Current Output Wiring
OI420 analog output modules will drive up to 275 ohms. If the loop resistance exceeds 275 ohms, an external power supply must be added as shown in figure 2-14. Correct polarity is essential.
Digital Inputs
Modules should NEVER be installed or removed while power is applied to the BASIC I/O AD.
The source of the discrete signal to be monitored is external to the BASIC I/O AD in most circumstances. The IDC5S digital input dry contact sense module is an exception. It provides its own current for sensing contact closure. Therefore, an external supply is not needed. In fact, they can be DESTROYED if an external source is connected.
The IDC5 and IDC5D input modules are polarity sensitive, and operate only when the "+" terminal is more positive than the "-" terminal. Polarity does not affect teh performance of the IAC5, IAC5A or IDC5S input modules.
Because the field sides of input modules are totally isolated from each other, like polarities can be wired common to make use of a single power supply.
The wiring and operation of digital input modules can be verified by closing the individual input sensing contacts and observing the change on the Module status indicators. They are ON when the module input circuit is energized.
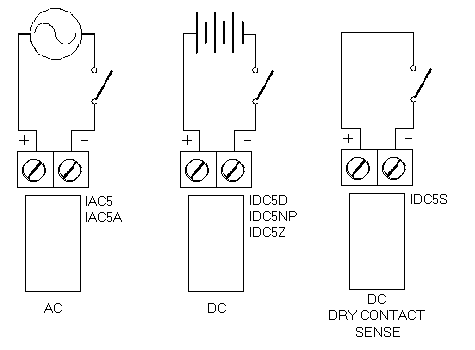
Figure 2-15 Digital Input Wiring
Digital Outputs
Modules should NEVER be installed or removed while power is applied to the BASIC I/O AD.
ODC5, ODC5A, OAC5 and OAC5A digital output modules are used to switch external power supply loads ON and OFF.
Because they contain a protective reverse diode, the ODC5 and ODC5A output modules are polarity sensitive and operate correctly only when the "+" terminal is more positive than the "-" terminal. A DC digital output module connected backwards conducts current through its protective diode and appears to be uncontrollable; it is! Polarity does not affect the performance of OAC5 and OAC5A digital output modules.
Because the field sides of output modules are totally isolated from each other, like polarities can be wired common to make use of a single power supply.
It should be noted that the status indicator only follows the logic instruction to the modules and does not show that the module, its fuse or external power is present. Outputs can only truly be verified by monitoring the output load with a multimeter, oscilloscope, or by employing a digital input module as a feedback tool.
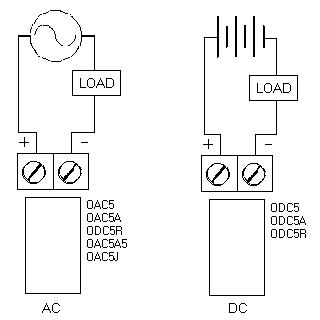
Figure 2-16 Digital Output Wiring
[ Home ] [ Table of Contents] [ Chapter 1] [ Chapter 2a ] [ Chapter 2b ] [ Chapter 3] [ Contact duTec ]
The duTec logo, and BASIC I/O AD are trademarks of duTec.
The information contained in this manual is believed to be correct.
However, duTec assumes
no responsibility for any of the circuits described herein, conveys no license
under any patent
or other right, and makes no representations that the circuits are free from
patent infringement.
duTec makes no representation or warranty that such applications will be
suitable for the use
specified without further testing or modification.
duTec general policy does not recommend the use of its products in
life support applications where
the failure or malfunction of a component may directly threaten life or injury.
It is a Condition of Sale
that the user of duTec products in life support applications+ assumes all
the risk of such use
and indemnifies duTec against all damage.
duTec
6979 Wales Road
Northwood, OH 43619
800-248-1632 or 419-666-4700
Copyright 1996-2000, duTec. All rights reserved.
Please contact webmaster@dutec.net
with any questions regarding this site.